


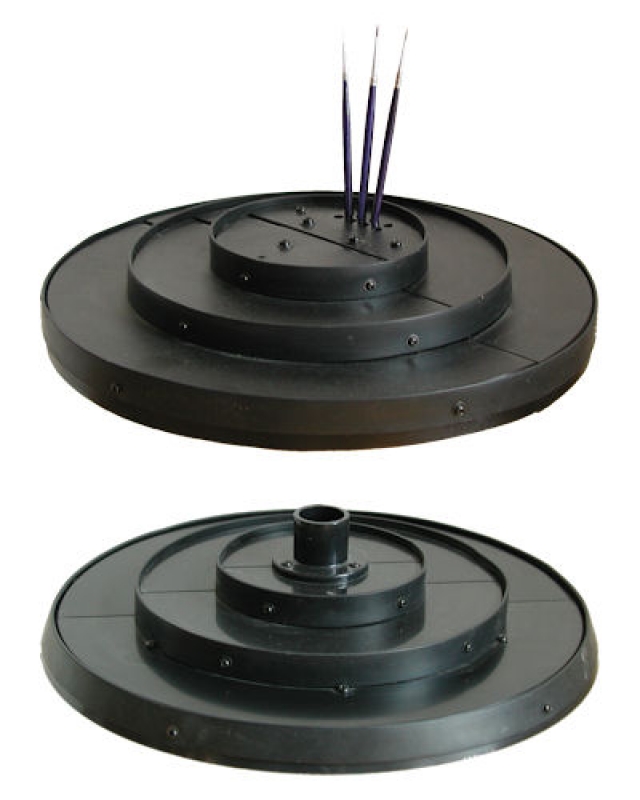
Making a revolving paintrack 回転式ペイントラックの作り方
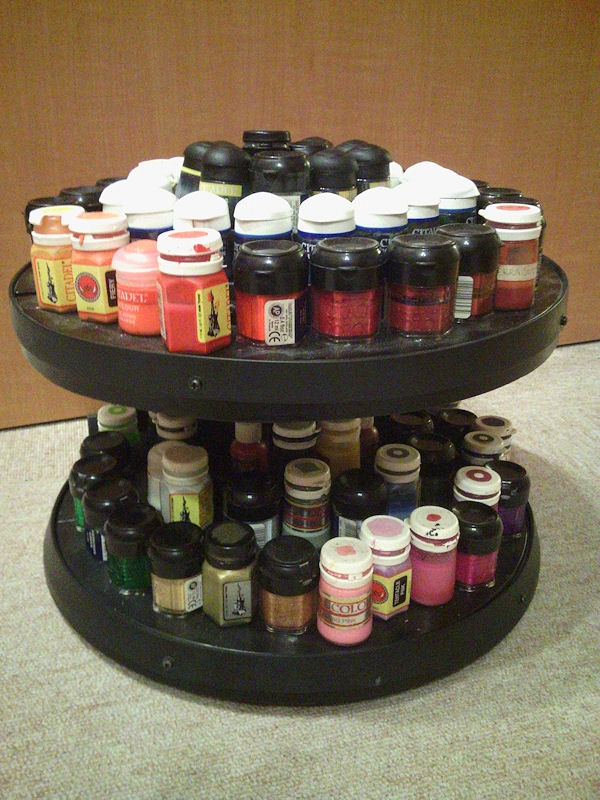
by David on 2012-02-03 (Fri) 20:33PMThis paint-rack was something I made for myself a few years ago, and since I haven't seen any similar paint-racks easily available (at least here in Japan), I thought it might make a good "how-to" article. So these are step-by-step instructions on how to build your own revolving paint rack, for approximately 6000 yen (60USD) in a couple of hours. It is a two part rack, connected by a sturdy pipe, and mine holds 102 paint pots of assorted Games Workshop paint/washes etc. Both levels revolve.
また分かりづらい翻訳だけど。。。ごめんネ!このペイントラックは数年前の自作品です。ネットで調べたが、使える商品はなかったので、自分で作成しました。約6000円でできましたので、便利かも。
You will need:

- 4 x plastic semi-circle display racks. I found mine in the local Nafco DIY store, near the toys. They are for displaying your collections of anime-figures / bottle-tops / whatever (see picture below). 1100 yen each.
- 1 x Metal pipe, cut to approximately 160mm length. I used 28mm diameter black stainless steel pipe. 300yen
- 2 x plastic pipe brackets, to fit 28mm diameter pipe. 250 yen each.
- 24 x 10mm bolts and nuts. 200 yen
- 1 x revolving TV stand, small enough to fit inside the base. Mine was 250mm diameter. 500 yen.
- 4 x 15mmx200mm metal brackets. 100 yen each.
Plus a screwdriver, small drill and a hacksaw.
必要な材料はこんな感じ:
- 4個 x 半円型コレクションケース。近くのナフコにあるはずが、楽天でも変えます。各1100円。
- 1本 x 直径28mmの金属またはプラスチック製パイプ。やく160mmの長さをおすすめします。約300円
- 2個 x 28mmパイプ用のプラスチック製ブラケット。各250円。
- 24本 x 10mmボルトとナット。200円
- 1台 x 回転式テレビ台。先日100円ダイソ店で見ました。直径250mmはおすすめです。500円。
- 4本 x 幅15mmx長さ200mmの金属ブラケット。各100円。
必要な道具はドライバー、ドリルと金属用・プラスチック用のこぎり。
We won't be using the display case like this, thank goodness, but that's how they're advertised!: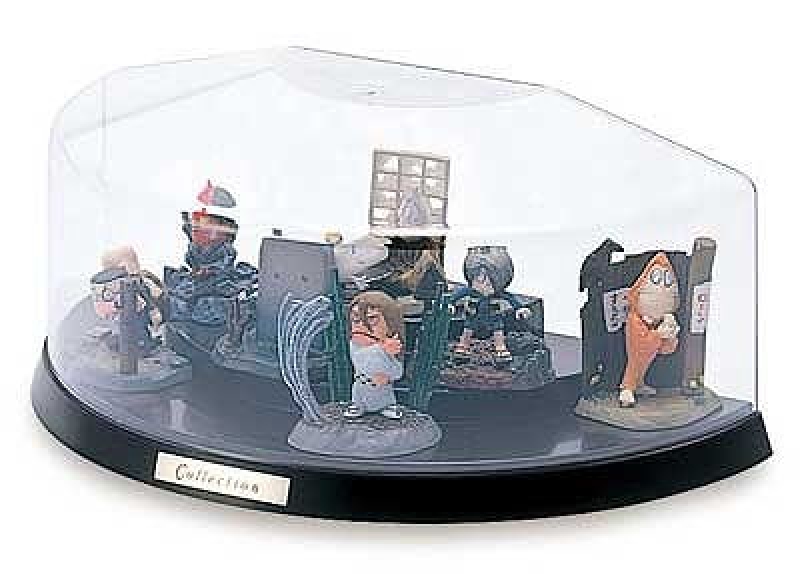
Step-by-Step Guide:
1. Take two of the display shelves, and put them back to back. There should be a solid double wall of plastic where they meet, and we need to cut out the shape of the pipe bracket, so it will fit there snugly (see picture below). Mark off the outline of the bracket, then cut the inner wall of one shelf right down to the lowest (smallest) level, using your hacksaw. Repeat with the second shelf. Your two shelf halves should now fit together with the circular pipe bracket held loosely in place.
まずは、トップ部分を作ります。丸いブラケットのために、コレクションケース2個の接する側面から形を切ります。下の写真をご覧ください。
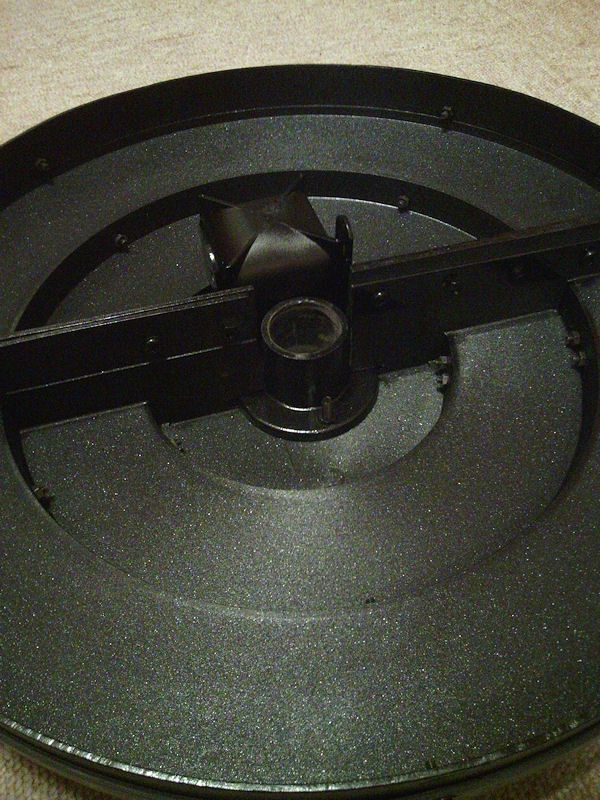
2. Now we simply need to bolt the two halves together. Holding the two halves together, place a straight metal bracket on the joining wall, and mark off some screw holes. Remove the bracket, drill the holes and screw together tightly with nuts and bolts (again, see above picture). The metal bracket, by the way, is not actually essential - it merely reduces the risk of the plastic cracking, by spreading the weight.
200mmのブラケットとボルトで、コレクションケースを固定します。固定する前に、必ず丸いパイプ用のブラケットを先に入れてね。上にある写真のようです。ブラケットをちょっと切らないといけない場合もあります。

3. With the two halves bolted firmly together, you can now bolt the pipe bracket in place. Your top shelf is now done. Easy so far, eh?
パイプ用ブラケットをボルトで固定します。トップ部分は完成です。
4. Step four is optional. I thought it might be useful to have some space to store brushes on the top rack, so I simply bolted a small plastic container to the underside of the top rack, and drilled some holes through to the top.
#4はオプションです。ブラッシュ用のコップも便利かなと思っていますので、下につけました。上面にブラッシュ用の穴を開けました。
5. We now move on to the bottom layer of the paint rack. For the top layer we bolted the adjoining inner walls together, but for the bottom layer we actually need to place the revolving TV stand inside. To do that, we need to cut off the adjoining walls for the largest (outermost) step of the shelves. If you look at the photo below, you'll see what I mean. The revolving TV stand sits almost flush with the bottom of the shelves, and to do that we need to cut some of the plastic away. It's not too painful, although getting the hacksaw to turn 90 degrees might require some careful snapping! Simply cut in a
|____________| shape along the inner wall, big enough to fit the revolving bit inside.
下のレベルを作ります。上と同じようにコレクションケース2個を接するが、その前にテレビ台のスペースを作らないといけない。一番直径が広い段の内面からスペースを切ります。切り線はこんな感じになります:|____________|
6. If the revolving TV stand now fits nicely inside on top of the second step, you can remove it, and bolt the two halves of the shelves together. We do this by using more of the straight metal brackets, fixed with nuts and bolts again. You may need to trim the metal bracket before fixing it in place.
トップ部分と同じように、コレクションケース2個を金属ブラケットとボルトで固定します。
7. Turning the bottom shelves over (so, the right way up again), we then place the second circular pipe bracket over the exact centre of the highest layer, and mark the screw holes. Drill the holes out, and fix in place with a few nuts and bolts.
上面にパイプ用ブラケットをボルトで固定します。
8. Take the revolving TV stand apart into two parts, by removing the center screw. Turn the bottom shelf of the paint rack over again (still with me?), and fix one half of the revolving unit to the paint rack using nuts and bolts. You might need to insert some extra bits of wood or whatever to make sure the revolving part is actually going to stick out lower than the bottom of the shelves (otherwise it won't revolve). That depends on the thickness of your revolving bit and the height of your shelves. I used two bits of balsa wood (see the photo below again). Make sure you use the correct half, so you'll still be able to screw it back together again.
回転式テレビ台の真ん中にある固定用のねじを取って、二つに分けます。段の裏側にボルトで固定します。高さが合わない場合には、木材棒などを入れます。私が作ったときに回転式の厚みはちょっと足りなかったので、台と段の間に棒2本を入れました。またはゴムのステッカーも役に立ちます。下の写真のようです。
9. Guess what's next? That's right, screw the revolving TV stand back together again. The bottom section of your paint rack is now ready.
つけたテレビ台を集めて整理します。
10. To finish, simply stick the metal pipe in the bracket of the bottom layer, and wiggle the top layer over the end. You're done!
最後に、下のラックのブラケットにパイプを入れて、上のラックをのせます。ペイントラックを完成です。
Options:
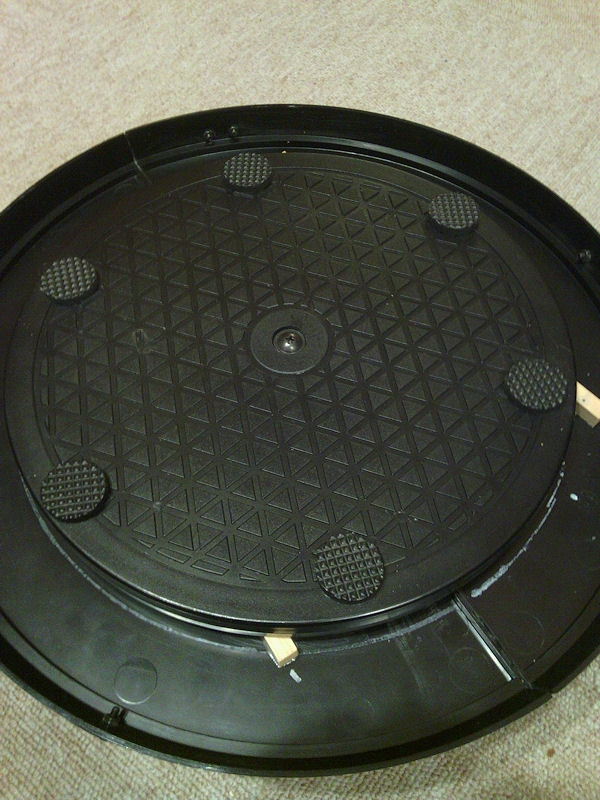
I carry my paint rack from the spare room into the living room every night, to watch (=listen to) TV while I paint. So to stop the paints sliding off while I carry it, I stuck some rubber lips onto the edges of the shelves. Strangely enough, I stuck these on with more bolts - no idea why!! Double sided sticky tape would have worked just fine.
一つだけ言っておきますね。私がテレビの前でペイントしていますが、収納は別の部屋ですので、毎日ちがう部屋からペイントラックを持っていきます。ペイントを落とさないようにペイントラックの周りにゴムのテープも張りました。
I also stuck some rubber pads on the the bottom, to protect the living room table.
If any of those step-by-step instructions are hard to understand, please let me know in the comments section below, and I'll try to clarify!
1 Comment :
Chris 2012-02-07 (Tue) 13:30PM
 Nice article David.
Although when I read the title I was expecting a new room in your house just for torture with a pain track in it.

Write a comment :
Random Images: