

An experiment in Dipping
by Chris on 2008-03-10 (Mon) 13:14PMDipping is a technique that can be used to achieve fairly nice tabletop painting standards with minimal work.
I find the most tiresome feature of this hobby is painting rank upon rank of basic troops. I am happy to spend 20 hours on a character model but despise doing the normal chaps. So after hearing of this technique on a painting forum I belong to I decided to run an experiment to see if it is worth the effort for the results it achieves.
I decided to use one of my unpainted chaos marauder horsemen for the experiment as the army is Nurgle and a brownish tint to the army seems like a good thing. I also have a real problem with painting horses as they annoy me no end.
Step 1 - Priming (approx 2 minutes)
I decided to give this guy a prime with Holts Grey Primer as I think grey has the best of both worlds when it comes to undercoats. White undercoats make the models seem very bright and the black undercoats make it difficult to paint nice looking lighter colours over them. Admittedly the black undercoat provides a base shadow if you just wish to basecoat and highlight but since the technique I am trying out automatically adds contrast to the mini I didn't need the black
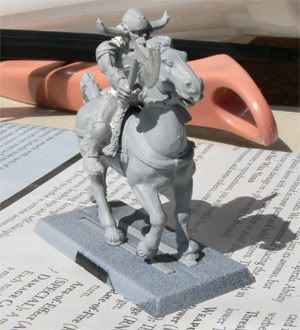
(not the actual dipped mini as he was already basecoated ![]() )
)
Step Two - Basecoating (Approx 15 minutes)
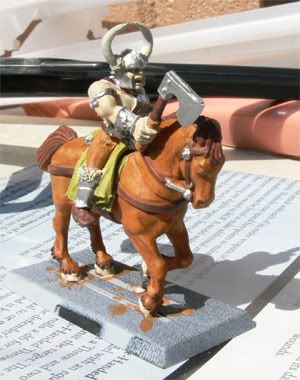
I used to spend a long time on basecaoting the minis. But here I diluted the paints slightly to get a 2:1 paint:water ratio and slapped them on willy nilly. As long as the main areas are covered and the big areas of colour are neat it is ok. The dipping process adds a gradiented shadow which will cover sloppy areas where the paints join. For this marauder I used a shade lighter for each colour than I would have done if I was painting it normally as the dip will darken the mini slightly so by using the next level up in terms of brightness on the basecoat, I am guessing the contrasts are much nicer and the highlights stay lighter.

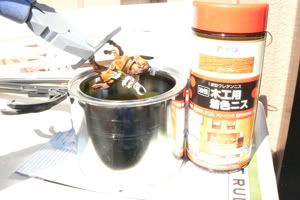
Stage 3 - The Dip (approx 3 mins)
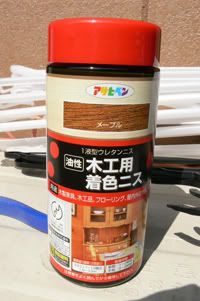
You need some kind of wood stainer to achieve the dip. I used one from Nafco made by AsahiPen in the colour of Maple:
I put it in a paint tin as the mini wouldn't fit in the can itself. Then you take the mini and dip it in. Then you let it drip the majority of the stainer off. Then in a box flick the mini repeatedly until there is no more stainer coming off of it (this can get messy - don't wear your work clothes...). Then you have a nicely dipped mini.
[David - Hi Chris, sorry to butt in! The kanji for 'oil-based' is 油性, while water-based is 水性. Water-based stainer might help reduce the shine, and won't smell as much.]
Stage 4 - The stand (24 hours)
After the mini has been dipped it will need about 24 hours to dry from what I have heard hence this log will be completed tomorrow morning once I have based and finished the mini. Here are some pics immediately after dipping. Already a big improvement I think. As the stainer drys it will create a nice gradient into the shadowed depths of the mini while leaving the raised areas with a natural highlight. I am guessing the more it dries the less shiny it will become too.

Stage 5 - Finishing touches (approx 10 mins)
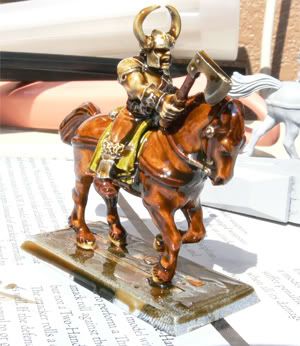
Once the mini was dried I picked out the eyes with a touch of white and blob of black and then proceeded by doing the base. I just added some sandy stuff and then painted it black with a highlight of bleached bone and then added some static grass. At this stage it is possible to go back and retouch the highlights but for my aim of getting fast tabletop quality armies I am not going to spend too much time doing that as I think the mini looks good as it is.
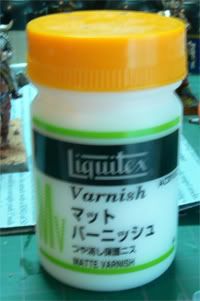
One of the big drawbacks of using the woodstain is that it leaves the model very shiny. There wasn't much change from the picture above with regards to this and for me this was the main disadvantage of this technique. However I gave it a couple of coats of a matt varnish I found in a local stationary store in the watercolours section and it completely dulled the mini down and I am happy with the very slight shine that is still there.
(thats a bit blurry - was rushing to finish the article)
The end result
So after all of this it took me about 25-30 minutes of actual working time to get this mini to a very good tabletop standard which is way faster than my normal attempts and although the quality is slightly worse, it sure beats those grey and silver models on the battlefield.


The Unit
When I got home last night I decided to finish the other 4 models in the unit with basecoats and dips. This took me in total about 90 minutes. Then this morning I wanted to base and get them ready for a shot but I thinned the stainer a bit last night as I wanted a less dark look to the models so the stainer is taking longer to dry. However I based them up and have them ready tonight. Here is a little shot of them which is a bit difficult to make out but I think the unit looks nice together and the paint job isn't too shoddy

If you look really closely, the guy on the far right is the one I did first and is much darker than the others, especially the skin tones. This was beacuse, as I said, I thinned the stainer for the second set to make less contrast and more subtle shading.
Other thoughts and tips
I guess the first question is why do you need to use stainer and not just a normal GW wash or ink. I think that the results would be very different if you used a wash simply because of the viscousity of the stainer makes a much more smooth and subtle shade with less tendancy to pool. I also think that the washes retain a certain translucency when used that makes the model look a bit too wet.
Here are some things I learnt in this experiment:
1. Be certain the models are secure in the bases or attached to the horses BEFORE you flick them to get the dip off (the standard bearer flew out of his base and the champion flew of his horse making it difficult to flick them properly once the disaster had happened).
2. Use a paint thinner to thin the stainer for a much ligher and less oppresive colour. The details are not as stark but the base colours show through more.
3. Do it outside and away from your open windows...the stuff smells bad.
Thoughts on Armies
I think this is a nice little technique but due to its very nature it works better with certain armies than others. I would say that Tomb Kings, Orcs, Beasts of Chaos, Skaven, Chaos, Lizardmen, and even Wood Elves could get away with it. I am not certain it is a go for High Elves or Brettonia, and Empire would need to be given a pretty dark colour scheme for it to look good. However there are may different colours of wood stain and with experimentation I am sure it is a technique that will achieve passable results with any army.
Conclusion
I think this is a great little technique and will definitely get a chaos army of mine painted where it would not have been before. The results are nice enough for tabletop quality minis and they are hard as nails as well - a coat of woodstain and varnish makies it nigh impossible to chip them. Time wise the affects are pretty good for the time needed. The main time consuming jobs are the basecoating and the basing. The actual dipping is done in a matter of minutes. I recommend people give it a go if they have trouble fielding fully painted armies like me.