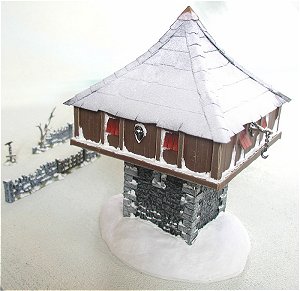
Snowy Watchtower 雪の塔
by David on 2009-01-10 (Thu) 13:43PMA while back I had experimented with some snow terrain, taking four of the plastic GW stone walls and testing out a snow mix of 1:1 PVA glue & white paint. The mixture was blobbed on with a small screwdriver, and then snow flock was very light sprinkled on top. This seemed to produce very satisfactory results - see the photo below.

So this time I wanted to try something larger, and Giovanni at GW Japan had kindly sent us some Forgeworld bitz last year. We'd received a heavy stone watchtower - but only the ground floor!
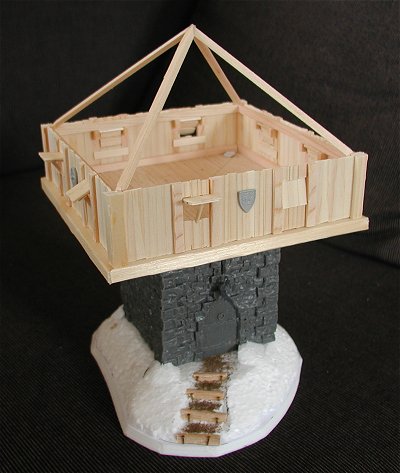
1. A quick and messy cut of white polystyrene, and the watchtower had a hill base ready. The original forgeworld model had an attached set of steps too, and I wanted some steps cut into the small hill base to give the model some depth and variety. Plus I thought the snow could be modelled quite well around melted patches where guards have been walking. Balsa wood steps gave it definite edges and sometiny brass pins held them in place - these would be painted as the rusted iron pegs you often see on mountain trails near here.

2. Next it was time to tackle the wooden platform that would make up the body of the tower. This was built in balsa wood again, plank by plank. A very time-consuming process, but looks very realistic. Each side has two window shutters, and I modelled only three of these open - I was planning to model on snow so as to give the impression of heavy snow being blown from only one side of the tower during the night, so the side with open shutters would only have a light covering of snow. In the photo you can see the starting frame for the roof, which took ages! I wanted to give the roof a definite bend, as I thought that would look cool with the snow piled on the lower roof tiles.
3. I capped the peak of the roof with a copper point, and some silver metal caps - just a slight nod to more Kislev-style roofing. The base was then almost completely covered in a thin layer of white modelling clay, to smooth out the polystyrene. The model was then painted, and the PVA/paint mix blobbed on various places of the woodwork and stone building. Finally the model was sprayed with clear matt varnish and then snow flock was sprinkled through a sieve into the wet clear paint. I added another two coats of clear paint and snowflock to two side of the roof again, to give it a heavier snow look.
Ross suggested a realistic way to create icicles, which I was very keen to do. But checking on the price of 'Water Effects' clear water glue (?), I abandoned that idea for now. Might add those later if somebody happens to own a bottle, hanging from the roof tiles.

