

Ringtail construction starts リングテイルの工事
by David on 2010-10-16 (Sat) 9:56AMSo last Sunday myself and Makoto headed down to Ringtail with a trunk full of tools, and together with Miyao and Baba and others started work on constructing Ringtail's new games room. We already had the plans in hand (see previous article), which made the whole process fairly smooth. For more photos, take a look at Ringtail's blog article (http://www.ring-tail.com/blog.php?BlogID=83).
日本語で読みたい方は、リングテイルのブログ記事を見てください!ごめんね。
 |
 |
First up was the shelf space in the corner. Thankfully Miyao and some local volunteers had spent the previous week staining the masses of wood we needed for the project, so we had a ready supply of beams which simply needed to be cut and attached.
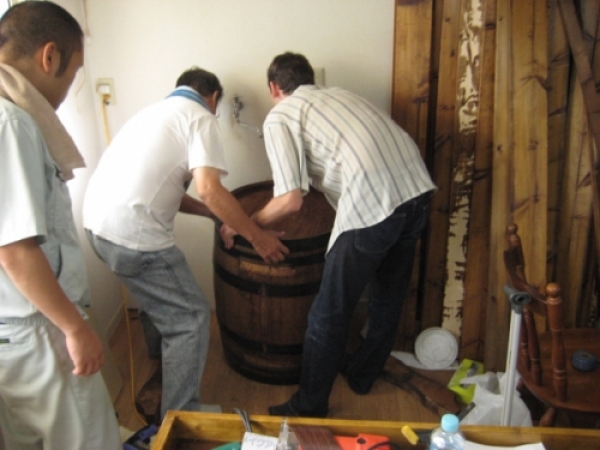
Next was the difficult part - fitting the new sink. We'd found a good-sized barrel a few weeks back on Yahoo auctions, which had a precut hole in the back. Handy for us, as we needed access to the inside in order to fit the small sink bowl. So after about an hour (!), we had managed to pull off all the unwanted feet supports and old nails. Makoto then cut a hole in the top, into which the bowl fitted snugly. Another small hole in the bottom of the barrel allowed us to neatly fit the barrel directly over the existing drainage pipe from the old sink cabinet. You can see us in the photo below, test-fitting the barrel over the drainage pipe. Note the tap, which was conveniently located on the wall above the barrel.
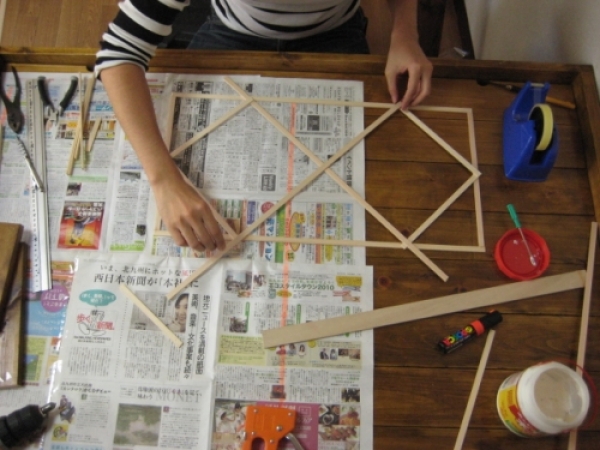
While some of us got on with the task of cutting beams to fit, work started on the window leads. If you look at the concept images at the top of the page, you'll see that the design calls for oldstyle leaded windows. Of course we only needed to make that effect, and fortunately I'd done this once before when making the fake window for the Dungeon. It's a fairly simple process, if a little time-consuming
First of all you buy stacks of 3mm x 10mm wood strips, which you use to make the outer rectangle of the window. You can use a modelling saw to cut lengths or simply snip with cutters. The joins will eventually be hidden, so neatness is not an issue. Then you lay out and cut the inner strips into diamond patterns and glue those in place with wood glue (see photo below). The wood glue is only really to hold it in place temporarily, as the subsequent step gives it the real strength. Heat up a glue gun, and put large blobs over all the joints. When that's dry, you have an optional step of slightly smoothing the edges of the wood to make it look more like softer lead. We didn't bother with that, as we had masses of windows to do. Next, spray the whole thing matt black. When it's dry, put a little silver paint into kitchen paper and gently wipe it along the wood and over the joints. It's similar to drybrushing in effect, and gives the thing a tarnished metal effect. We rather ran out of time on Sunday, but Miyao will be finishing the other windows over the coming weeks.
While the windows were being dealt with, we covered the skirting boards with wood-effect vinyl sticker sheet, which would also be used on the window frames to give the effect of wood. Next we had to create a false wall to hide the airconditioner. In the original plans we had planned to move it, but we decided it wasn't really worth it. Instead we decided to cover the airconditioner with the same wood-effect stickers, and create a large wood 'beam' either side of it.In the photo below you'll see that the sticker sheet wasn't completed that day - another job for poor Miyao!
After that everyone helped cut and fit the wood beams (cheap 2x4s) all the way around the room. That went pretty quickly, and we soon had things looking good. Two large beams went across the ceiling, as we'd found that the room actually had 2 light fittings. Miyao had bought just the right size of beam to conceal the speakers, but we didn't get around to running through the wiring that day.
We were pretty knackered by this time, so we called it quits for the day. While the others had a quick bite to eat, I took the opportunity to cut the posters I'd printed the day before. Isn't having an A3 printer handy sometimes? I'd found these cool maps on the net, on the Warhammer RPG site, I think. Detailed maps of cities like Praag and Middenheim. Quick and simple decorations.
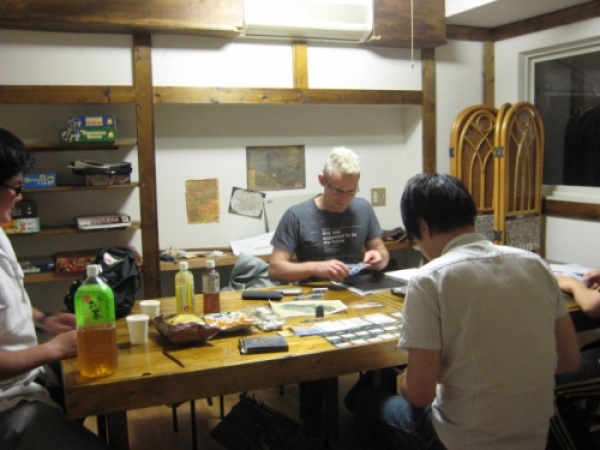
So this is how far we got that day. Ringtail had a midweek RPG night, and they got to use the room for the first time - good photo, eh? Quite a bit remains to be done, but the big stuff is at least out of the way.
I'll be posting up reports of the final steps as and when they're completed:
- Stools
- Paint desks
- Windows
- Shutters
- Speakers
- Shield and deer head ornaments (doing those as we speak)
- Noticeboard
- Chandeliers
#4. Shields for Ringtail リングテイル用の盾作り >>